Skype indeed is one of the oldest and most reliable video calling platforms out there on the internet. But, unfortunately, Microsoft has made the whole process to delete skype account much less convenient. Yet, it is true that no provider would want to lose any of their potential customer out there. So, the complication is justified.
If you want to delete skype account permanently, for you it means that you are going to need to put some time and effort in this. But do not worry as we have got you covered. As a summary, to delete skype account permanently, you have to go through several steps with which you’ll be able to cancel any ongoing subscriptions, remove available payment methods and unlink your Microsoft account from your Skype account successfully.
But, do not worry at all, as this guide is going to take you through all the required steps to delete skype account permanently. By the end of this article, you will be able to successfully close down your skype account just by yourself. Furthermore, we are also going to tell you how you can request a refund for the unused credits if you have any.
You can easily delete skype account from a computer or even delete skype account from mac as the process for both remains pretty much the same. Let’s dive into the steps right now.
Delete Skype account permanently
As we mentioned earlier, sadly there is no such way to delete skype account in one click, but there are various steps required to be completed to be able to complete the whole process without any error. Also, there are a lot of if’s and then while deleting your Skype account which we are also going to talk about later on.
Here is a brief of whatever steps we are going to take to achieve our goal to delete skype account permanently. One thing to note is, it is very much important to complete the first 3-4 steps before you close down your account. The steps are:
- Canceling any active subscriptions and requesting a refund.
- Turning off recurring payments and removing payment methods.
- Unlinking the Microsoft account from Skype account.
- Removing personally identifiable details from the Skype profile.
- Sign out of Skype on all devices.
Although, if you have got any Skype credits in there, I’d recommend you to use them up first before you delete your Skype account. As you won’t be able to get back a refund for your skype credit once the account is closed.
Why Unlink Microsoft Account?
As per the official site, “Your Skype account is the same as your Microsoft account. If you close it, you’ll no longer be able to sign in to other Microsoft products or services such as Outlook.com, Office Online, OneDrive, Xbox Live, or Windows.”
So, it is a must to unlink your Microsoft account at first before deleting your Skype account, so that you can keep your Microsoft account as it is also the key to Outlook.com, Xbox Live, OneDrive and all other Microsoft services.
Deleting the Skype Account
Here we are going to start off with the actual process. There are some steps that you may or may not require to follow. So watch out. For example, you can skip step one if you had not signed up with your Microsoft account or if you do not want your Microsoft account anymore.
Step 1 – Unlink Microsoft account
In this step, we are going to unlink your Microsoft account from your Skype account. To do this, follow the steps below:
- Go to com and log in from your web browser to delete skype account from the computer.
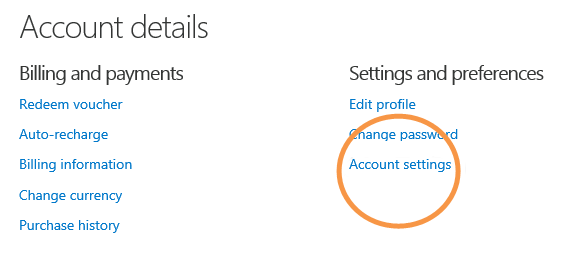
- After you have logged in, go to your account settings. Then, scroll down to the bottom of the webpage. Search and click on Account Settings under the Settings and Preferences section.
- Once the Account Settings page is opened, search for the column with “Microsoft account” and click the “Unlink” option.
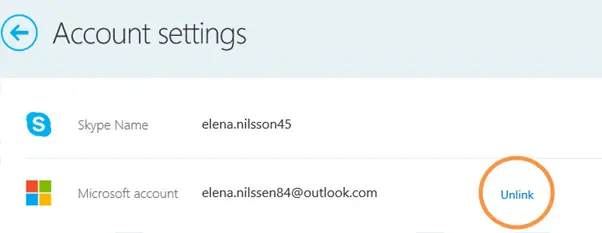
- Note: After finishing the procedure, if you get to see “Not Linked” instead of “Unlink”, you can safely continue to the next step now.
Step 2 – Cancel Skype Subscriptions (if any)
After you have finished the first step, we are now going to cancel any recurring Skype subscriptions out there.
- If you are trying to delete skype account from mac or a computer, go to your Skype account settings.
Within the account settings, click on the subscription that you want to cancel, which will you find on the left side of the screen.

- Now, click on “Cancel Subscription” to proceed.
- In the next step, click “Thanks but no thanks, I still want to cancel” to confirm the subscription cancellation.
Step 3 – Disabling Recurring Payments
In this step, we are going to turn off the recurring payments if you used the recurring payments feature to have your Skype credit automatically topped up.
- To do this, go to the Account Details section over the web.
- Now, search and click on “Billing & Payments”.
Under the “Auto-Recharge” section, click on “Disable” under the status.

Step 4 – Request for Account Deletion
As you have successfully completed the above steps, you can now safely proceed to request the Skype team to delete Skype account.
- To do this, go to the Skype account closure page and follow the simple steps there. The system may prompt you to re-verify the password.
- Once you are logged in, click on “Next”.
- Within the “Select a reason” dropdown list, go ahead and select the desired reason.
- Now, select “Mark account for closure”.
More to note
Once you have successfully completed the above 4 steps and marked your Skype account for closure, it is going to get permanently deleted after 60 days. Within the 60-day time frame, you can reopen your account in case you change your mind. You just need to simply log in to cancel the account deletion (In case, if you want to).
If you want you may decide to remove your profile picture, update your status to offline or invisible, or remove all other skype profile details. But those steps are not mandatory to perform. Also, make sure to sign out from all devices.
I hope you liked this article on how to successfully delete your Skype account and if you did don’t forget to leave a comment down below and let us know.
